A Guide to get you started with something pretty simple
Welcome back good folks! This is going to be a simple guide on laying track, swapping out switches, building roads, texturing the ground, and detailing for a simple grain elevator scene. My biggest hope is that this will get you started in a new good direction on making routes for Trainz, whether big or small!
Getting Started
The getting started part is really easy. It is probably the easiest thing you'll be doing in this quick nifty little guide. Again, its time to use that imagination and come up with an idea to lead to a vision of what you would like to see on the baseboard of this route. Once you have this in place, we need to fire the program up and head into surveyor. Click on new route, and call it "Simple Grain Elevator Scene". This way you can find it easier in the routes list in case you don't finish it all in one setting. Once you get that cleared out of the way all you see is a bare baseboard now. It is officially time to move on the next step of the process.
The Creation phase
Rather than make zillions of different subtopics, I'm just going to simply group everything to do with creating the route into this phase here. We are now ready to begin making a simple grain elevator scene. Well its pretty self explanatory the very first thing we should place on our bare baseboard. We need to place the grain elevator needed for the scene. To do this, hit the structures tab and type in Modern Grain Facility DES (This is outside of built-in content and needs to be downloaded if you don't have it. Go to Content manager, search for Modern Grain Facility DES and it should show up with a DS logo to the left of the name. Right click on it, and hit download on the drop down and go from there :).). Once you have located it, click on the baseboard to add the structure. There it is! Our first asset needed for the scene is now on the baseboard!
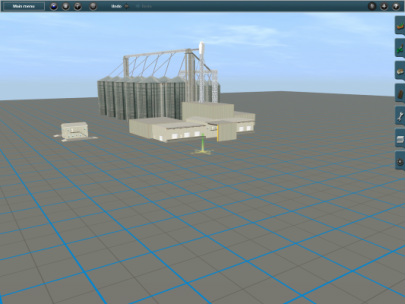
The grain elevator should look a little something like this when placed onto the route. The front area is where the hopper cars will load/unload.
If you wish to do so, you can rotate the elevator around to get it in a fashion that you like. There's a nifty secret to rotating objects that can give you a more effective rotate. If you hold down the crtl key on your keyboard while rotating the object, it will rotate it more gradually rather than abruptly, making it easier to get straightly placed assets on to your route.
Okay, now its time to start actually laying some tracks for the elevator. My preferences are I like to lay several tracks out with a main/branchline running alongside them. You never know when some empty/loaded cars will need to be stored until the next train comes to pick them up, so it's always good to have storage tracks for those cars. First step is to click on the railroad tracks tab. For this I will be using the JR Lt grey track which can be found at http://jointedrail.com/
Okay, now its time to start actually laying some tracks for the elevator. My preferences are I like to lay several tracks out with a main/branchline running alongside them. You never know when some empty/loaded cars will need to be stored until the next train comes to pick them up, so it's always good to have storage tracks for those cars. First step is to click on the railroad tracks tab. For this I will be using the JR Lt grey track which can be found at http://jointedrail.com/
To download the track from Jointedrail, you'll need to register to get the freeware. (They have some good payware locomotives at which you can use and have fun with as well, along with fun free ones too). Once you've registered, go the trackside tab at the site, and download all of the track you see listed there. It will download as a .CDP file, which is what CMP/Trainz uses to install content into the game. Simply let it install and restart the game as necessary for the new track to show up.
Now we need to start laying the track out. Once you have located the track, simply click and drag as straight as possible, clicking again when finished to make it set. (After completing this would be a great time to save your work, to do this, hit the main-menu tab, and click save on the drop-down menu. Check over the naming and make sure it is correct, if it is, continue on by hitting the check mark button to save.)
Now we need to start laying the track out. Once you have located the track, simply click and drag as straight as possible, clicking again when finished to make it set. (After completing this would be a great time to save your work, to do this, hit the main-menu tab, and click save on the drop-down menu. Check over the naming and make sure it is correct, if it is, continue on by hitting the check mark button to save.)

The track layout should look a little something like this. If you have more tracks than what I have, its ok, maybe this grain-elevator does big grain-trains.
Now its time lay-out the main/branch line that serves this elevator out. We also see something else before doing this, one simple baseboard is not going to be enough. This means we need to add at least 2 more baseboards.
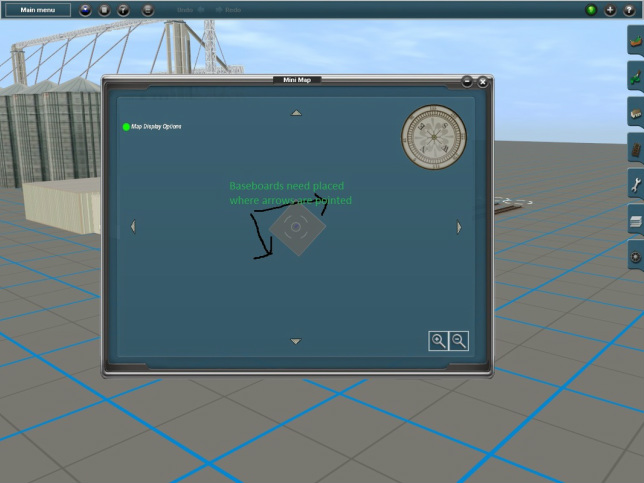
This picture shows the mini-map, letting you see where we should place the baseboards.
To place the baseboards, its time to open up the terrain features tab. Once you have it open, go down to the button at the bottom left corner of the tab, and click on it. Once you've done that, pull up the mini-map by clicking main-menu and selecting mini-map on the drop-down menu. Now, we need to click at the edge of the baseboard at the north and south ends to add the extra baseboards (Could be the east and west ends depending upon whether or not you rotated the elevator around).
(This would also be a very good time to save your work! Save often, as you wouldn't want to lose this valuable art-work in the making!)
Once you're done adding the baseboards, now we're ready to actually move on to laying out the main/branch line serving our elevator. For this, I am going to use the JR Lt grey track terrain, which comes in the track packs you downloaded from Jointedrail previously. Try to lay it out as straight as you possibly can! Nobody is perfect at track laying :). Even I have to go back, and correct little zig-zags in the track. I would consider not laying the main/branch line right next to the track that will be merging on to the main. There will be a purpose to this later on :)
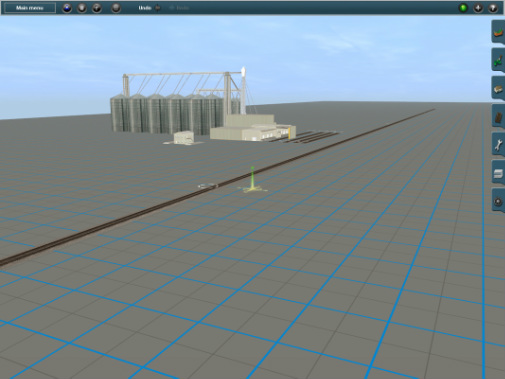
Our main/branchline should look a little something like this. It may vary since not everybody's idea of the elevator will be the same. We all have our different visions of what this should look like :)
This elevator is not industry interactive, in other words, it will not on its own unload/load rail-cars. That's ok, because we can make it interactive by adding a multiple industry. Multiple industries are special pieces of track that we can place to make any industry we can dream up interactive and have the ability to load rail-cars. First we need to open up the structures tab (The tab with house on the front of it) and type in the search bar at the top, multiple industry. Once you've found it and have it located, close the structures tab (It will save where you're at when you come back to it :) ), and open up the tracks tab. Once here, you need to click on the red X button and delete the track that is inside the front area of the elevator. This is where we will be place our new multiple industry track piece. If possible, I would use the multiple industry new, since it is just a flat piece of track with no special additions. Once in place of where the old non-industry active track used to be, we need to configure it. I assume that you already have the structures tab open at this time. From here, we need to click on the ? button. That button is to edit the properties of a particular structure.
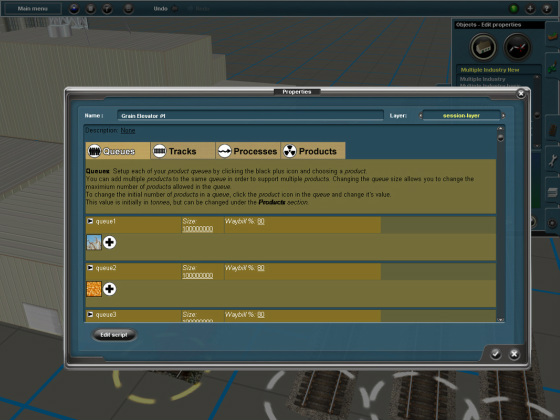
A brief overview of the editable properties of the multiple industry asset.
Now its time to start actually editing the properties for this. The first thing we see is the Queues tab. This is for what products will be available for loading/unloading at this elevator. There are several assets we will need that I believe are on the download-station:
Soya beans,<kuid2:30671:9120100:1>
Oats,<kuid2:30671:9110412:1>
Corn,<kuid2:30671:9070990:1>
Wheat,<kuid2:30671:9100810:1>
Barley,<kuid2:151900:100039:1>
After you've downloaded those, you will need to add them to the multiple industry so that railcars can be loaded and unloaded with these products. To do this you will press the big plus button, and a pop-up menu will show up with a mile long list of products to use. First product to add is wheat, so type in wheat at the top, and click wheat when it appears. Now, click the check mark when done. There's a size area, click on that, and type 1 followed by as many zeroes as you can possibly type. Yes there is a maximum limit as to what you can do :). Just do the same thing for the corn, barley, oats and soybeans. That's pretty much all there is to it at this time :)
Now its time to extend all of our storage tracks and the loading track. You can't extend a multiple industry, however, you can add track to the ends of it by going into the tracks tab, and adding tracks from it. Do not extend them all the way to the end though. Now what we're going to is going to look really stupid to begin with, but you'll soon see how useful it is. Through the two ends of the non-main/branch tracks, we'r
